Top Recipes

Recent Creations

Dec 11, 2012

Ground Beef Barbecue Pizza

Ground Beef Barbecue Pizza


Before we decided to go on a more gluten-free diet, we really were big Pizza lovers and we still are though we make it more of an occasional treat nowadays. This particular recipe is a favorite of my little boy - William. He was only about 4 or 5 years old (he's 7 now) when I first made this pizza recipe but even at that young age this already became his favorite. Mind you, he's been eating curry too even at that age so his taste buds are quite use to diverse taste and textures! This picture tells you a lot about how much he loves this pizza! Surely, his favorite!


The inspiration for this recipe came from a cook book which I have read once at Barnes and Noble. We often go there as a family as my kids love reading so naturally that's a place for us to hang out during Friday afternoons, after class hours. My kids will check out the books they love (Sophie heads to the Princess' section as usual and William to any corner with books about Lego or robots - every little boy's favorite nook  I am sure!). Me? Of course, I always browse the Cook Book section, not so much to buy but just to get inspiration for new recipes to try, perhaps learn a thing or two about new ingredients and even check the latest culinary trends. Now I found this book, and I cannot recall what the title is (otherwise I would have heartily given credit to the author/s)  - perhaps it's a book about ground beef recipes (that's the most I can remember) and this particular recipe which I discovered there I cannot forget. It was not difficult to recall because the recipe was pretty easy to do and with only a few ingredients to remember. So armed with whatever was left on my memory bank, I tried to re-create this simple but quite delicious Barbecue Pizza Recipe. Am pretty sure your family will enjoy this and especially MOM! - after all, the ingredients are pretty much pantry staple (well, if you keep pizza dough at hand all the time!). So here's a quick  Barbecue Ground Beef Pizza for those nights when you fancy Pizza but want to make one at home. I use the store bought pizza crust for this but no one will stop you if you want to make your own too! :-)
 Ground Beef Barbecue Pizza

Ingredients

1 lb / 1/2 kilo ground beef
1 medium onion, chopped
2 (10-12 inch) pizza crust, store-bought or homemade
1 cup barbecue sauce (your choice)*
2 cups of grated cheese (mozarella or sharp cheddar or a combo of both - this is good for 1 pizza crust)
*I often use Sweet Baby Rays but you can use your favorite barbecue sauce or make your own.


Procedure

Preheat the oven according to the pizza manufacturer's instruction.

Spray some non-stick cooking oil on a heated frying pan. Brown the ground beef. Crumble with a fork as you brown it to separate the meat. Stir in the chopped onion and cook for about 2-3 minutes. Add the barbecue sauce. Stir it in to ensure that all the beef are coacted with the sauce. Simmer on low heat uncovered for about ten minutes. Drain the beef if necessary.

Divide the beef mixture into two (if using two crusts). I usually freeze half of the sauce for later use and only do 1 pizza since we are only a small family of 4.


Spread all but 3 tablespoons (set it aside) of the beef mixture on the pizza crust. Sprinkle the cheese all over the sauce. Use the left over beef as topping for the pizza.


Bake in the oven according to the pizza manufacturer's instruction (approximately 10-12 mins with a temp range between 400F - 450F).
Enjoy a slice or two! Lovely with some salad on the side!

If you wish to print the recipe, there's a print-friendly icon at the end of the post. Click on the "remove images box" for easy printing.


If you like what you see and would like to receive new recipe updates, do join our site or subscribe to our posts. Of course, we'd love you to join us on Facebook too. Happy browsing.

Ground Beef Barbecue Pizza

Share:

Nov 12, 2012

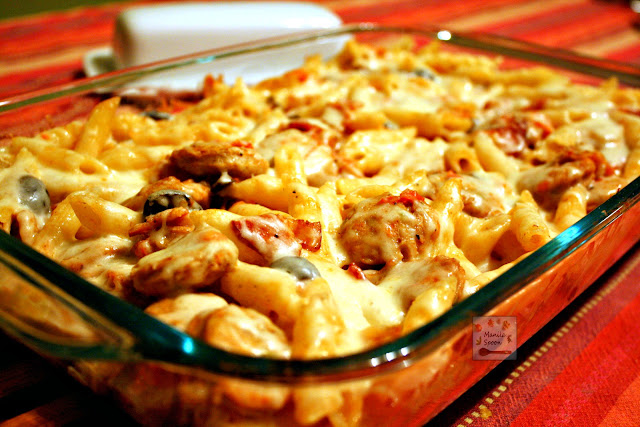
Sausage and Pasta Bake with Bacon and Olives

This casserole dish is deliciously comforting! With bacon, sausages, olives and cheese - - you can't lose with this easy and yummy Sausage and Pasta Bake!


When I was growing up (especially when I was living in our tiny island called Marinduque), having an oven (whether gas or electric) in one's house was quite a luxury and, truth be told, impractical.  An electric oven was considered a luxury because it was expensive and most people cook on the stove top anyway. More importantly, it was impractical, at least the electric one - because there was no electricity to power it. I remember those days, when we only had power at night between 6-10 pm. This was in the early 80s. Oftentimes, there were outages too, in fact - everyday! Oh, life in a small island. In fact, while we were proud owners of a refrigerator - it was gas-powered. Literally, my mother has to ignite some flame to get  the fridge to start working. I felt like I was camping. Thankfully, despite all its dangers our whole family survived.

Don't get  me wrong, those days were the best times of my life, too. So many lovely memories were built around nights when my cousins and I would play under the glow of the moonlight! I won't trade those times for anything. They were the best!


Now you may wonder - what does this have to do with the recipe above? Don't worry, we'll get there. When I finally left for England to pursue my masters in Law, I began my journey on learning how to cook. I didn't really fancy much of the food in our dining hall or the refectory so I found myself  often in the kitchen in Wadham College cooking! I even bought a little rice  cooker so I can cook rice anytime. There, I finally got the chance to cook using a real electric oven! This was in 2000. Don't laugh now but this is true!

When I learned how useful an oven can be (we mostly cook our food on the stove top in the Philippines to this day), then began my love for baking and cooking in general. Baking is wonderful and has become something I truly enjoy. I didn't start with cakes right away, mostly easy casserole dishes. I was ecstatic everytime I baked something especially when they come out - edible - and truly enjoyable! So far my whole family has survived and the kids have been growing despite my cooking! :-)

So, here is one of those easy dishes that I make for my family in the oven. I must admit, it involves a little bit of stove top cooking to begin with. With my upbringing, I can never take that away. Enjoy! :-)
  
Ingredients

12 oz Penne pasta
1-2 Tbsp olive oil
4 Bacon strips, chopped into small pieces
3 Garlic cloves, crushed
1 medium Onion
1 lb cooked Chicken Sausage, chopped diagonally
½ cup White Wine    
4-5 Roma or plum Tomatoes, chopped
½ cup pitted Olives, chopped
2 Tbsp  parmesan cheese
1 ½ cups Mozzarella cheese or Italian Blend cheese
Ground black pepper, to taste
  
Procedure

Cook the pasta according to package directions. Make sure that it's just cooked al dente. Preheat the oven to 350F (180 C).

While the pasta is cooking,  place the olive oil and bacon on a large skillet. Cook until the bacon starts to render its fat.  Add the garlic and onion and sauté for 3-4 minutes or until the onion starts to soften.

Add the chicken sausage. Cook until the sausages have browned a little. Pour the white wine and deglaze the pan.  Add the chopped tomatoes and olives.  Season with ground black pepper  (there’s enough salt in the ingredients that I don’t feel it’s necessary to add more but feel free to season with salt, if you wish to). Simmer for 10 minutes.


When the pasta is done, toss it with the sauce. Check the seasoning. Stir in the parmesan cheese. 


Transfer to a baking dish and then top with the Mozarella or Italian Blend cheeses. Bake for 15-20 minutes or until the cheese is melted. The finished product - delicious!


How about another photo to show it's delicious-ness?


If you like what you see and would like to receive new recipe updates, we'd love you to join our site or like us on Facebook. Happy browsing!

Share:

Nov 8, 2012

Sauteed Butternut Squash with Ground Beef/Pork (Ginisang Kalabasa)


When I was still in the Philippines and living with my family, this dish was on our table every week. We truly love squash in the Philippines and this particular dish can be found in any cafeteria or canteen all over the country. It's a favorite for lunch or dinner! It's also pretty cheap to prepare yet quite nutritious.

I am glad that I am not the only one who enjoys this dish. My husband who I thought would not enjoy this Filipino dish at all absolutely love this! My kids, especially William, love to eat this too.

Often butternut squash is considered more as a dessert ingredient or a side dish usually spiced with cinnamon and sweetened with syrup or brown sugar. However, butternut squash is actually a wonderful accompaniment to meat especially with pork or beef. It's natural sweet flavor complements the meat and marries well with seasonings such as soy sauce or fish sauce. The squash provides some sweetness to an otherwise very savory dish.

I use my Giniling Recipe (Ground Pork Sauté), a basic foundational recipe for a lot of Filipino dishes, for this one. Once you have made it, all you need to do is add the prepared squash and then cook it until tender. A very simple yet truly flavorful dish.


Ingredients

1 butternut squash (peeled, seeded and cut into inch-long chunks)


1 Recipe for Giniling (Ground Pork Sauté). Link here.


Procedure

If you plan to use the entire butternut squash, then I suggest using the entire recipe for Ground Pork Sauté. But if you plan to use only half of it, then half the Ground Pork Sauté should be enough. Adjust the amount of the ground pork recipe to how much butternut squash you wish to use.

To the cooked Ground Pork Sauté, add the butternut squash. Cook by simmering until the squash is tender about 10-15 minutes.

Another vegetable that complements squash is green beans or Asian long beans. If you wish to make this combo - cut the beans to about 2 inches in length and then cook it with the squash. Cook until the beans are tender but not mushy. Alternatively, you can opt to just use the beans on its own. The beans are an excellent accompaniment to the Ground Pork Sauté too!


Enjoy with steaming hot rice!

This is featured at Wednesday Extravaganza. and Weekend Potluck.

If you like what you see and would like to receive new recipe updates, we'd love you to join our site and like us on Facebook. Happy browsing!
Share:

Nov 6, 2012

Easy Steak Casserole


It's that time of year again when we can use our ovens a lot! That means lots of yummy casserole dishes to serve. When I am craving some beef for dinner but do not fancy going through all the trouble of making an elaborate beef burgundy (though it's always worth the effort, let me emphasize!) or I simply do not have much time to prepare it - this is my go to dish - a very simple yet flavorful Steak Casserole. You can prepare this in a matter of minutes (the only difficult part, if ever, is the cutting up of the steak but a very sharp knife would be tremendously helpful!). After a little browning of the beef, throw all the ingredients in a casserole dish and then to the oven and wait as the aroma of that delicious Steak cooking wafts through your house. Before you know it, it's time to sit down and enjoy your delicious meal!  

I used green peppers and celery here but feel free to experiment on your favorite veggies. Next time I'll replace one of the veggies with mushrooms or mix all three!


Ingredients


2-3 Tbsp olive oil and 1 Tbsp Butter
6 garlic cloves, crushed 
1 kilo/ 2.2 lbs chuck steak, cut into thin strips  (or bite size cubes)
1 1/2 Tbsp flour seasoned with salt (I use about 1 tsp) and pepper, to taste
2 Green bell peppers, cut into strips                                                        
3 Celery sticks, chopped diagonally
3/4-1 cup red wine (I love the deep red wine taste so I go for more!)
¼ cup water
8 oz Button Mushrooms, washed and sliced (optional but encouraged!)

Tip: For extra flavor and moisture, when the beef is already fork tender, add some 8 oz sliced mushrooms and bake again in the oven covered with foil for another 15 minutes or until the mushrooms are tender and have released their juices! So good!
 
Procedure

Preheat oven to 325F.  Grease a casserole dish with a little oil. Heat the oil in a large frying pan. Melt the butter in it.
In the meantime, coat the steak with the seasoned flour. Sauté the garlic in the pan briefly, just until aromatic, about a minute or less. Quickly brown the beef strips in butter.
Transfer the browned beef tips (and garlic) on the greased casserole. Place all the veggies on top. Pour in the wine and water.

Cover the casserole dish with foil (double the foil) and transfer to the oven. Bake for about 1 1/2 hours or until the beef is tender. Serve with rice or mashed potatoes! Beef heaven!

If you wish to print the recipe, there's a print-friendly icon below the post. Click on the "remove images" box for easy and convenient printing.

If you like what you see and would like to receive new recipe updates, feel free to join our site and like us on Facebook. Happy browsing!
Share:

Oct 25, 2012

Thai Green Chicken Curry


Filipino food is not generally spicy. There's only a certain region in the Philippines which feature a spicy cuisine. So while we do have our own version of chicken curry (at least my family does!), it was never really spicy but relied more on either turmeric or ginger for flavor rather than curry powder or paste.
Share:

Oct 20, 2012

Moroccan Chicken Tagine


My husband and I have done some travelling both before and after we got married. We love to experience different cultures, get to know different folks and of course, try new cuisines. Once in awhile I try new recipes from other countries, especially the ones which we have had the chance to visit. It makes us feel like we are back in that country whenever we eat their food.

One of our favorite places to shop is the World Market because it gives us the chance to sample certain products from around the world. One time I saw this Tagine from one of their stores. A Tagine is an earthenware pot that is used in traditional Moroccan cooking. It is a circular cooking pot with cone-shaped cover that sits on the base during cooking. The dish cooked in it is also called "Tagine." Since Mark has been to Morocco, I thought I'd cook him some Moroccan style dish.


I love this dish because of the flavor imparted by a lovely mix of spices commonly used in Moroccan cooking. It gives the chicken stew a nice robust and complex flavor. The addition of dried fruits give the dish some texture and added sweetness. Since we like to use fruits (esp. raisins) in Filipino dishes, I thought this dish is perfect for me.     

I didn't actually use the Tagine in cooking the stew but used my regular pan instead. However, a Tagine is always used as a serving dish. At least, the dish looks more authentic this way! :-)

So, if you want to try a different kind of dish, I would highly recommend this. Enjoy!

Ingredients

2 Tbsp olive oil
3 cloves garlic, minced
1 onion, finely chopped
1 tsp each ground ginger, cumin, turmeric
1/2 tsp ground cinnamon
2 Tbsp tomato paste
1 1/2 cups chicken stock
Freshly squeezed juice of one orange
7 oz package of mixed dried fruits, chopped
A few Tablespoons of raisins (optional)
Salt and pepper, to taste
1 1/2 lbs skinless boneless chicken thighs, cut up
1/3 cup sliced almonds
Chopped fresh Parsley (optional)

Procedure

Heat the oil to a medium in a large deep pan. Add the garlic and onion. Saute briefly until aromatic, about a minute or less. Do not let the garlic brown. lmmediately, adjust the heat to the lowest setting. Add all the spices and cook gently for about 4-5 mins or until the onion softens.


Pour the orange juice and the dried mixed fruits.  Stir. Season with salt and pepper.


Stir in the tomato paste and the chicken stock. Add the chicken and coat with the sauce. Bring to a boil. It may look quite thick at this point, but don't worry it will produce some more liquid as the chicken cooks. (I prefer the sauce to be thicker rather than runny).


Cover and simmer for about an hour or until the chicken is fully cooked and tender. You may add a little water as you cook it if you find that the sauce is too thick for your liking. Adjust seasoning if necessary.  Sprinkle the sliced almonds for garnish or you can also sprinkle it with some chopped fresh parsley instead. This stew is even better the next day!

If you wish to print the recipe, there's a print-friendly icon at the end of the post. Click on the "remove images box" for easy and convenient printing.


Serve hot with rice and plain yogurt on the side, if desired. Enjoy your Moroccan chicken stew.

If you like what you see and would like to receive updates on new recipes, we'd love you to join our site or like us on Facebook. Thanks for stopping by and happy browsing!


Share:

Sep 21, 2012

Pork or Beef Menudo


I bought a big family pack of boneless pork ribs this week so I had been cooking Filipino food like crazy! Adobo, menudo, Asian Bar-B-Q ribs are just some of the recipes on my menu list.

This particular menudo recipe is one which my mom cooks for us especially when I am at home on vacation. She told me that to give the meat a really good flavor you need to cook it with fresh tomatoes and not just dump it with the tomato sauce. Also, she does not use tomato sauce (though that's fine if you prefer to use this instead) but ketchup 'cause it's a little sweeter than tomato sauce (at least the Filipino ketchup!) and enhances the flavor of the whole stew. Another technique that she told me is to make sure that you only put the ketchup towards the end of cooking so it does not overpower the whole dish but "enhance" it. So, my only contribution here really is adding a little lemon juice to perk up the dish - I think that and fish sauce really make this a yummy dish.

Think of this recipe as a basic guide and tweak the seasoning to your liking. This dish is so good that you won't even miss the liver pate that is added in traditional menudo. My hubby doesn't like  liver so am glad that I can make a delicious menudo without it! Thanks, Mom!


Ingredients

2.2 lbs/1 kilo pork (Pork belly, shoulder or boneless ribs), chopped into cubes (1 to 11/2 inch)
2 Onions, chopped
1 head Garlic (or 6-8 cloves), peeled
Salt and pepper, to taste
2 large Plum Tomatoes, chopped
2 Tablespoons Fish Sauce*
2 dried or fresh Bay (Laurel) leaves
1/2 cup Water
2 medium to large Potatoes, cubed
2 medium Carrots, cubed
1/4-1/3 cup Ketchup (pref. the Del Monte Tomato Ketchup brand)*
1 Red Bell pepper, chopped (roughly the size of the carrots and potatoes)
1/2 cup raisins (I end up using more 'cause I love raisins on anything!)
Brown sugar, to taste

*If you're not a fan of fish sauce you can replace it with Soy sauce (start with 1-2 Tablespoons) and a little lemon juice (2 teaspoons). You can adjust the taste to your liking. Fish sauce is great though. :-)

*You can also use tomato sauce.

Procedure

Place the pork cubes in a large pan or Dutch oven and let it cook in medium heat until it changes its color. No need for any oil as the meat will release some of its fat in the process. Add the garlic and onions and sauté. Season with a little salt. Continue to cook until the pork has browned (but not fried all the way) and the onions have softened.

Add the tomatoes and fish sauce and continue to sauté for a couple of minutes. Add the bay leaves. Cover and simmer on low until the pork is tender.

When the pork is already tender, add the water, potatoes and  carrots. Cook covered until the vegetables are tender. Add the sweet peppers, raisins and the ketchup (or tomato sauce). Cook for another 5 minutes or just until the raisins are re-hydrated and the sauce is fully heated through.

Adjust the seasoning to your taste. If it's a little tart, sprinkle some brown sugar to balance the taste. Don't make it too sweet as you have raisins to balance the sour and savory flavor of the other ingredients. It should just be a perfect balance of sweet, tart and salty! Have it with rice, of course!

If you wish to print the recipe, there's a print-friendly icon at the end of the post. Click on the "remove images box" for easy printing.

If you like what you see and would like to receive new recipe updates we'd love you to subscribe to our posts and join our site. Also do like us in Facebook so you can get the latest updates and so much more. Thanks for visiting and happy browsing!


Share:

Sep 19, 2012

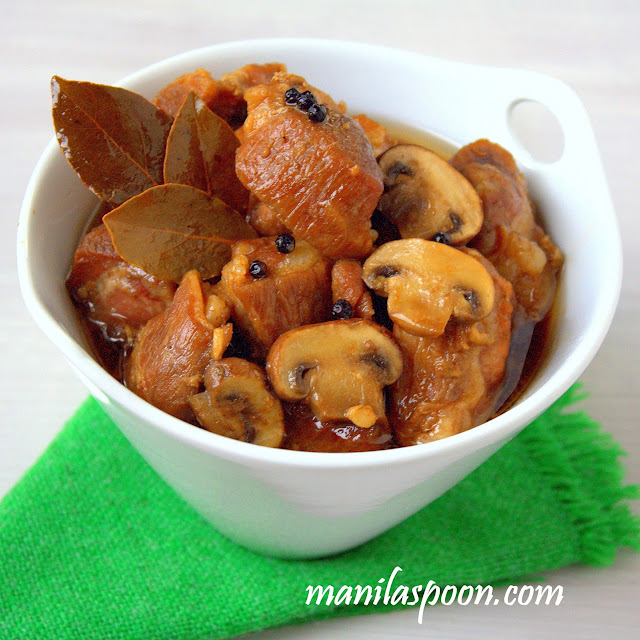
Ultimate Pork Adobo (Chinese Style)


If there is a dish that defines what Filipino cuisine is all about - it's adobo, the unofficial, national dish of the Philippine islands. There are as many versions of adobo as there are many islands in the Philippines. Perhaps not as many as 7,107 islands (the whole Philippine archipelago) but ask each Filipino family and each will tell you their own adobo recipe handed down from one generation to another differentiated not so much by the kind of ingredients they use but more on the style or technique in cooking the dish.

Adobo always has meat - that's the star of the dish. It can either be chicken or pork or a combination of both. While the name is of Spanish origin and is similar in some ways to the Latin/Hispanic "adobo" in the sense that meat is steeped in or immersed in a sauce and cooked in it, adobo in the Philippines refers mainly to the dish (as in Pork adobo) rather than a cooking technique. Typically, adobo is cooked in a soy and vinegar sauce with bay leaves, lots of garlic, black peppercorns (whole or crushed), and may be sweetened with a little sugar or even pineapple juice or syrup. Because of the long and slow cooking, the meat absorbs the delicious flavor of the sauce and is so good paired with rice. Normally, we cook a lot of adobo so we have left-overs which can be re-heated day after day. The longer the adobo stands (in the fridge of course, though in the olden times it's the vinegar that served as its preservative) the better the taste. When you have some left-overs (if you ever have some 'cause you may want to eat it all in one sitting - so more-ish!) serve it with fried rice and some fried eggs and you have a classic Pinoy breakfast - AD-SI-LOG - short name for Adobo (this dish) - Sinangag (Fried Rice) - and Itlog (Fried Eggs). Yummm!

For this particular version, I depart from the usual adobo (though I will be posting a recipe for the classic adobo in a future post). Here I am making an adobo without using vinegar - Chinese style. For this I am deeply indebted to my friend Rebecca who graciously shared with me the ingredients she used and the way to make it. After I tasted the adobo she brought in one of our Filipino parties, I just had to get her recipe. It's so good you won't even miss the vinegar! I have never made pork adobo any other way! For me this is the ultimate pork adobo. Even my husband (not really a big pork fan) loves this and never says no when this is on the table.

What I particularly love about this adobo is the addition of mushrooms. I have seen adobo with pineapple rings but never one with mushrooms and this gives the adobo even more depth in flavor and adds a lot in texture. I have tried many kinds of mushrooms -both dried and fresh shiitake, enoki, mini-portobellos and the common white button mushrooms. Any of them are great for this dish but the best for me are the fresh shiitake 'cause they are so meaty and fully absorb the flavor. If using dried shitake, don't forget to rehydrate them first before using and keep the liquid used in rehydrating them 'cause you can add that into the sauce for an even better flavor (if that is even possible with this already yummy sauce!).

So here goes the yummiest and easiest Adobo ever!


Ingredients

1 kilo / 2.2 lbs pork (get the part with some fat on it like pork shoulder, boneless country style ribs or pork belly)
Oyster sauce – 1 1/2 Tbsp
Brown sugar – 2 Tbsp (adjust to taste)
Soy sauce – 1/4 cup (I use Kikkoman)
Garlic – 6-8 cloves, minced or crushed or chopped (a small head of garlic may be used)
2 Bay leaves
Freshly ground pepper (or whole black peppercorns), to taste
8 oz fresh mini-bella/portobello mushrooms, or 2 - 4 oz shiitake mushrooms (fresh or dry)
A few drops of sesame oil (Very essential!)

Procedure

Clean the pork. Cut up the pork adobo style - about 1 1/2 - 2 inch cubes or chunks. They will shrink as they cook so I make it a little bigger. 


In a deep pan or a Dutch oven, mix the soy and oyster sauces, sugar, garlic and ground or whole peppercorns. Coat the pork with the sauce. Insert the bay leaves.

Bring to a boil. Cover and simmer on low until pork is tender between 1 1/2 - 2 hours. 

When the pork is already tender, add in the mushrooms. Continue to simmer until the mushrooms are cooked and tender about 5-10 minutes.

Add a few drops of sesame oil. Serve hot with rice.

Cook's Notes:

If using fresh Shiitake (4oz) - clean them quickly under running water or wipe the tops clean. Cut of the stem (can't eat them too chewy!) and then chop.

If using dry Shiitake (2 oz) - reconstitute/rehydrate the mushrooms in warm water for about 20 mins or until tender. Reserve the water. You may need to strain it first to remove any impurities and add it as needed if the adobo sauce dries up. This liquid is so full of flavor so don't throw it away especially if you like a more liquidy adobo.

If you wish to print the recipe, there's a print icon at the end of the post. Click on the "remove images box" for easy and convenient printing.

If you like what you see and would like to receive new recipe updates we'd love you to subscribe to our posts and join our site. Also do like us in Facebook so you can get the latest updates and so much more. Thanks for visiting and happy browsing! 


Since then we have a great high priest who has passed through the heavens, Jesus, the Son of God, let us hold fast our confession. For we do not have a high priest who is unable to sympathize with our weaknesses, but one who in every respect has been tempted as we are, yet without sin. Let us then with confidence draw near to the throne of grace, that we may receive mercy and find grace to help in time of need.
(Hebrews 4:14-16 ESV)
Share:

Sep 11, 2012

Frikkadel - Delicious South African Braised Meatballs


In 2007, we had the chance to go back to South Africa. We stayed there for about six months. We really had the best of time. We love the people we met and became friends with. We love the stunning scenery especially the game parks. And of course, the food, the glorious food we enjoyed tremendously.
Share:

Sep 3, 2012

Slow Cooker Melt-in-Your-Mouth-Meat-Loaf

Gluten-Free Version

One of the earliest cookware that I have purchased when we first came to the USA was a slow cooker. I've had mine for about 7 years now and it has truly been my best friend in the kitchen. I rely on it when we have guests. I like that you can just place your favorite ingredients there and then leave them to cook for 6-8 hours and you come back with the yummiest dish (as you smell the aromatic flavors waft through your house) and you didn't even fuss. I can cook hours ahead of time which leave me more time to do other things (like clean the house perhaps before the guests arrive!). And of course, it's indispensable in summer time 'cause I can cook desserts in it without having to turn on the oven. What a big help.

I have quite a few recipes that I cook in the slow cooker over and over again.  One of them is the Meatloaf - a classic American comfort food. If you don't do it right,  meatloaf can be dry and bland. But since this one is cooked in the slow cooker, it has never happened to us. It always comes out moist and flavorful, too. For this I am indebted to Taste of Home's - Melt-in-Your-Mouth-Meat-Loaf recipe. I adapted it to suit my small family and, at that time, used the the ingredients available in my pantry. Since it all worked out well (sometimes we finish the whole loaf in one sitting, courtesy of William!) I decided to just stick to my simple adaptation.

Also, since we have been dabbling on a more gluten-free diet, I have replaced the breadcrumbs with ground almonds, but if you're not into this, feel free to just use bread crumbs. Honestly, I can't say which is better because they are both good. I don't even miss the breadcrumbs when I use the ground almonds but I leave that decision to you! Enjoy!

Regular Version


Print Friendly and PDF


Click on the print-friendly icon to print. To remove photos, click on the image button and check "remove images."

Ingredients

1 egg
1/2 cup milk
1/3 cup ground almonds (I use Trader Joe's)*
1 small onion, chopped
3/4 tsp salt 
3/4 tsp rubbed sage (the most important!)
1 pound ground beef 
1/4 cup ketchup
2 Tbsp brown sugar
1 tsp yellow mustard
1 tsp Gluten-free soy sauce

*Use seasoned bread crumbs instead if not doing the gluten-free version

Procedure 

In a large bowl, combine the first six ingredients. Crumble beef over mixture and mix well (mixture will be moist). Shape into a round loaf.


Place in the slow cooker. Cover and cook on low for 5-6 hours or until no pink remains and a meat thermometer reads 160°F.
   

In a small bowl, whisk the ketchup, brown sugar, mustard and soy sauce. Spoon over the meat loaf. Cook for another 15 minutes or until heated through. Let stand for 10-15 minutes before slicing.

If you wish to print the recipe, there's a print-friendly icon at the end of the post. Click on the "remove images box" for easy printing.


Enjoy!  If you like what you see and would like to receive new recipe updates we'd love you to subscribe to our posts and join our site. Also do like us in Facebook so you can get the latest updates and so much more. Thanks for visiting and happy browsing!
Share:

Aug 25, 2012

Indian Butter Chicken


To say that we like chicken curry is an understatement. We love curry to the max! Whenever we travel, whatever country that may be - the first restaurant we always try to look for is an Indian curry house.  

Before I got married, I wasn't a major fan of anything spicy. In the region (Southern Tagalog) where I grew up, spicy dishes are not really a big thing. We usually love sweet, sour and salty but spicy, not too much. But then I met my British husband who is into everything spicy. I was converted by him. He loves chicken curry. When we were still in England we used to visit Brick Lane in East London for some curry therapy. If you are ever in London, this is the place to go if you want to get curry. There are rows upon rows of curry houses there. I miss this place!

However there is one special curry place for us and, no, it's not in India or the UK or even the USA (truth is, there is no Indian restaurant where I live).  Sad, isn't it. We found it, of all places, in Vietnam! While it may take years before we go back and eat there again, we have fond memories of Vietnam and most certainly the curry we had there. Here's a photo of myself in front of the restaurant in Ho Chi Minh City. It's not much to look at but the curry is great, if you are able to wake up its owner to cook for you! Seriously, it was great and the best we have tasted! Check this out when you find yourself in the streets of Saigon.


And for good measure, here's another photo of me and my hubby in Vietnam. Photo was taken while we were cruising the Mekong Delta. Happy Memories!


Before I get any more sidetracked, here's one of our favorite curry dish - Indian Butter Chicken. This is a mild curry so feel free to up the heat to your desired spice level. Enjoy!


Print Friendly and PDF

Ingredients

5 pieces Roma or plum tomatoes - or 2 (14oz/410gr)  cans of diced tomatoes (fresh is better though!) 
2 Tablespoons oil and 5 Tablespoons Butter 
2.2 pounds (1 kilo) skinless but bone-in chicken thighs (boneless are fine but they tend to fall apart)
Thumb-size peeled and chopped fresh ginger or 1 tsp of ground ginger
3 teaspoon ground Cinnamon
2 teaspoon each red Curry powder, ground Cumin and ground Paprika
2 Tablespoons brown sugar
1 ½ - 2 tsp salt, or to taste      
¼ - ½ cup of plain Yogurt (you can use heavy cream, if you prefer)                
Freshly squeezed lemon juice (a must for me!) 

Procedure 

If using fresh tomatoes, cut-up the tomatoes and then place in a food processor or blender and puree until smooth (puree the canned tomatoes too, if using this instead). In a deep pan, heat the oil and butter on medium to low heat until the butter melts. Stir in the spices, and let sizzle briefly, for a minute or less. Add the salt and brown sugar and stir until combined. Immediately, add the chicken pieces and coat them with the spices.

Mix in the pureed tomatoes. Though the mixture may seem thick at this point, it will thin out as it simmers. Bring to a quick boil and then cover the pan and gently simmer for about an hour or until the chicken is tender, occasionally stirring it. It is done when the chicken is tender and the sauce is medium-thick. It is already good and yummy at this point but if you like a creamier sauce, add plain yogurt or heavy cream and then squeeze some fresh lemon juice, to taste. Cook a little further without boiling just until the cream is heated. Garnish with coriander/cilantro leaves. Serve hot with freshly steamed rice (basmati or jasmine are the best for this!) and some green veggies on the side. Curry heaven!


Note: While the chicken curry tastes great already on the day it is cooked, it may be done a day ahead and chilled on the fridge so the flavors continue to infuse overnight. Even better the next day!

If you like what you see and wish to receive updates on new recipes, feel free to join our site or like us on Facebook. Thank you so much for dropping by! Happy eating!

Oh, taste and see that the Lord is good!
Blessed is the man who takes refuge in him! Psalm 34:8


Share:
© Manila Spoon | All rights reserved.
Blogger Template created by pipdig