When I run out of ideas for lunch or dinner (yes, that happens even to food bloggers!), this becomes a fall back dish. The reason is a little sentimental. My husband and I, though we grew up worlds apart (literally and figuratively) this was something we both had in common. We both grew up eating baked beans.
May 23, 2012
Pork and Beans
When I run out of ideas for lunch or dinner (yes, that happens even to food bloggers!), this becomes a fall back dish. The reason is a little sentimental. My husband and I, though we grew up worlds apart (literally and figuratively) this was something we both had in common. We both grew up eating baked beans.
May 18, 2012
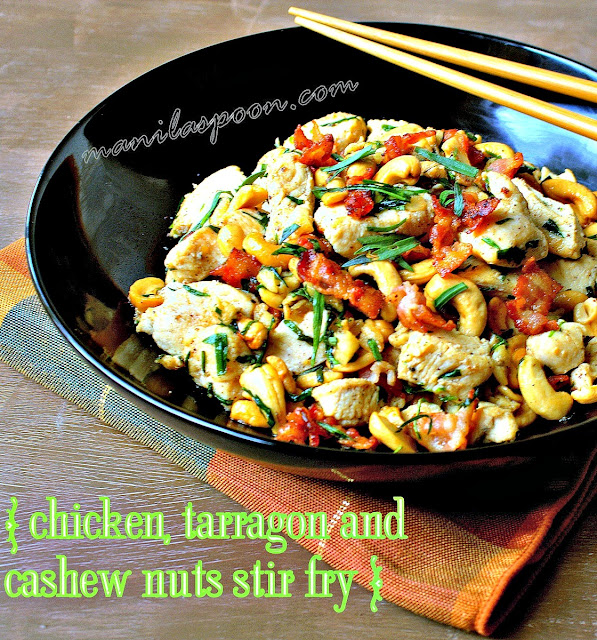
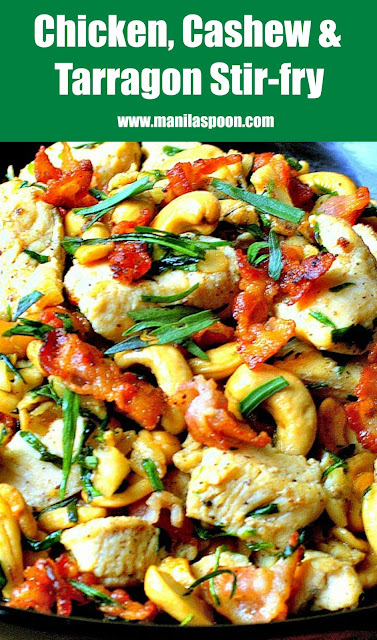
Chicken, Cashew and Tarragon Stir-fry (with Bacon)
I would have tried to cook this a long time ago if I had the recipe. I don't know why I haven't asked for it. Unfortunately, when my husband was craving this dish for dinner it was a little too late to call England so I had to make this based on how my hubby remembers it was done.
When we were eating the dish, he suddenly remembered that he forgot to tell me an important ingredient of the dish ---- bacon! How can anyone forget bacon? It's a good thing that when he mentioned that the chicken was stir-fried --- butter and garlic came to mind. So, it still came out good. The next time I made it for sure bacon was added. If you don't fancy bacon you can just leave it out.
Ingredients
A little olive oil (1 tsp or if using a non-stick pan, a little spray on the pan will do)
3 tbsp butter or 3-4 bacon strips, chopped
2 cloves garlic, crushed
1 lb chicken breasts (2 large ones), chopped in bite-size pieces
Salt and pepper
4-6 tbsp fresh tarragon, chopped (we love tarragon so we use a lot of it but it has a strong aniseed-like flavor so adjust to taste!)
1/2 cup roasted cashew nuts (whole or in pieces)
Procedure
Melt the butter in a little oil in a large skillet or frying pan. If you prefer, use bacon instead. Cook the bacon until it turns brown and renders its fat. Sauté the garlic and let it sizzle for a few seconds (not more than a minute to prevent browning). Once the garlic has flavored the butter/bacon fat and oil, you may opt to remove it from the pan but if you love garlic, let it stay!
Raise the heat to medium high and then add the chicken pieces. Season with salt and pepper.
Stir-fry for about 2-3 minutes or until the chicken has changed its color and is starting to brown a little on its sides.
Stir in the cashew nuts and the tarragon leaves. Cook for another minute or just until chicken is tender.
Garnish with a little more tarragon on top. Serve immediately.
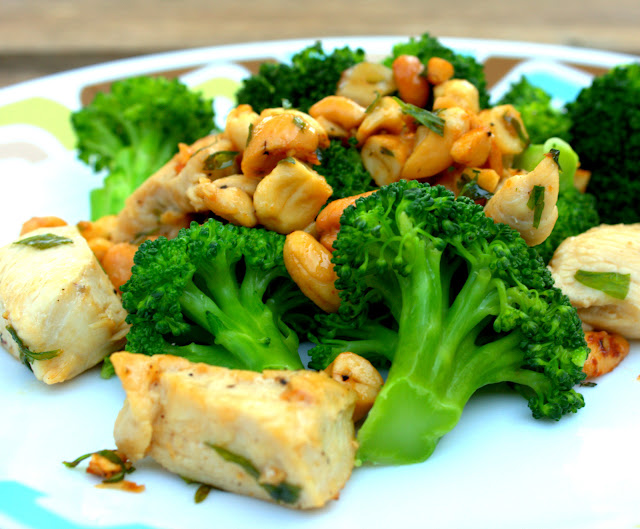
Have it with green veggies on the side. Broccoli perfectly pairs with it.
May 17, 2012
Salmon on a bed of Caramelized Onions
The Philippines has 7,107 islands. I grew up in one of those. It is called Marinduque, a heart-shaped island in the heart of the Philippines. It is not a very big island. Infact, it will only take you about 5-6 hours to drive around the island and you won't even be doing it at 70 mph. But that is my home and I still miss it a lot.
Our house is located near the beach so waking up to a beautiful sunrise (I'd dare say we have an average of 300 sunny days in a year!) and going to bed after a lovely sunset is typical.
Living near the sea has its advantages. We always get the first catch! I remember my mom buying the first catch of the day from fishermen back from their overnight fishing.
It still continues to this day. Here's a photo of William with a lady selling her fish. I took this photo when we visited the Philippines in 2010.
Though I terribly miss eating sea food made from the freshest catch available, I try to make up by serving a fish dish in our house at least once or twice a week. It's my way of re-connecting with my lovely island-province. Perhaps someday, we will return to the island to cook our own catch!
If you like what you see do subscribe to our posts via email. You can also like us in Facebook or join us on Pinterest so you can get the latest recipes and so much more. Thanks for visiting and happy browsing!
Ingredients
4 Salmon Fillets (pref. with skin on)
4 medium size onions (add more depending on how many salmon fillets you are using)
Olive Oil (just a little)
3 tbsp Butter (plus more, if needed)
Salt, Pepper and dried Dill weed
2 tbsp dry white wine
Procedure
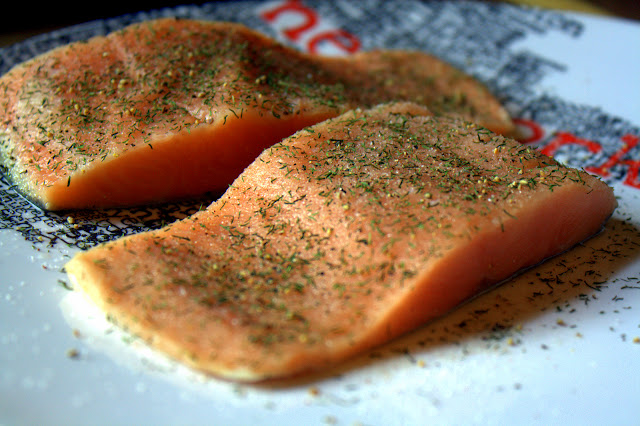
Season the salmon with salt, pepper and dill weed.
Chop the onions into rings.
In a large skillet, melt the butter with a little oil (a teaspoon or less). Add the onions and sauté until golden brown. Set aside.
Raise the heat to medium high. Add more butter/oil, if necessary to the pan where you cooked the onions. Fry the salmon, for about 4 minutes on one side. Flip the fish and fry the other side for another 3 minutes or until it's firm to the touch and fully cooked. Transfer to a warmed plate.
Return the onions to the skillet and pour in the wine. Simmer for about 1-2 minutes or until the wine has reduced by half.
Place the onions on a serving platter and place the salmon on top. Enjoy!
If you wish to print the recipe, there's a print-friendly icon below the post. Click on the "remove images" box for easy and convenient printing.
If you like what you see and would like to receive new recipe updates, we'd love you to subscribe to our posts or join our site. Needless to say, we'd love you to like us on Facebook too where you can get more recipes and updates. Thanks and happy browsing!
May 15, 2012
Mushroom Sauce
Mark and I
love mushrooms. We have it twice a week, either for breakfast with eggs or at
dinner combined with some chicken or beef. Sometimes I use it with other vegetables too but
for this particular recipe, it is the queen.
This is a lovely
sauce that perfectly complements chicken. I am imagining chicken scallopini as I
write. If I have chicken breast at hand, I grill or pan-fry the meat and when
it’s cooked, I either mix it with the sauce or just pour the sauce on top of it
and have it over pasta or rice. Comfort food that’s sure to please everyone
(unless you hate mushrooms!) JIngredients
A little olive oil (about a teaspoon)
1 tbsp butter
1-2 garlic cloves, minced
1 8oz package mini-Bella mushrooms, chopped
¼ cup dry White wine
1 cup cream
Ground nutmeg (optional)
Salt and pepper, to taste
Procedure
In a saucepan or sauté pan, melt the butter with a little oil. Sauté the garlic briefly, just until aromatic, about 1 minute or less. Add in the mushrooms and cook until the mushrooms have released all its liquid about 5-8 mins.
Pour in the white wine. Increase the heat and reduce the wine to about half. Lower the heat and stir in the cream.
Cook until the sauce has thickened (when it begins to coat the back of the spoon). Season with a dash of nutmeg and a little salt and pepper.
Pour the sauce on the chicken and serve over rice or pasta.
If you wish to print the recipe, there's a print-friendly icon at the end of the post. Click on the "remove images box" for easy printing.
If you like what you see and would like to receive new recipe updates, we'd love you to subscribe to our posts or join our site. Needless to say, we'd love you to like us on Facebook too where you can get more recipes and updates. Thanks and happy browsing!
May 14, 2012
Chicken Breasts in Paprika Sauce
It was Mother's Day yesterday, so I decided to give my family a treat (I know, shouldn't it be the other way around?) :-) Well, our family day out is usually on a Monday and Sunday is the Lord's Day, so I didn't really mind waiting till the next day.
Anyway, I decided to cook them something French --- just to try something new. Chicken Breasts in Paprika Sauce - Supremes de Volaille Hongroise. Easier to say it in English, if you ask me. Also, it was an easy dish to prepare yet it looks quite elegant too.
Well, it was the rice that accompanied the chicken that sealed the deal. Am glad my British husband did not complain that I was giving him French food. He did suggest that perhaps next time I should try to use the hot paprika to give the dish a bit of a kick!
You see my hubby loves anything spicy but just like the French I only used the mild/sweet paprika for this one.
So, depending on your taste preference, you can use either the sweet or spicy paprika. Either way, I think it's a winner, especially if it is eaten with rice!

Ingredients
2 tbsp butter, divided
1 small onion, chopped
2 tsp paprika (sweet or spicy, whatever you fancy)Salt, to taste
1/4 cup dry white wine
1 cup Velouté
1 tbsp oil
1 lb chicken breast (about 2), skinned, boned and halved
1/3-1/2 cup heavy cream
Procedure
Melt 1 tbsp of the butter in a small saucepan. I usually add just about a teaspoon of oil, to prevent the butter from burning/browning.
Add the onion. Season with the paprika and salt and cook until onion is soft about 5 mins.
Add the white wine. Increase the heat, reduce the wine to about half. Once reduced, lower the heat.
Stir in the velouté sauce. Cook until heated up and everything is fully incorporated.
Set aside and keep warm.
Season the chicken halves with salt and additional paprika.
Melt the remaining 1 tbsp of butter with the oil in a large frying pan. When hot, sauté the chicken in the pan for about 3 minutes per side, or until springy when pressed.
Transfer the breasts to a serving plate. Deglaze the pan with the heavy cream.
Pour in the velouté sauce mixed with the onions. Cook until heated through.
Pour the sauce over the chicken and serve with steamed rice and green veggies.
If you wish to print the recipe, there's a print-friendly icon above the recipe. Click on the "images box" and choose remove the photos for easy printing.
Velouté Sauce
A velouté sauce, pronounced [və.lu.te], along with Tomato, Hollandaise, Béchamel, and Espagnole, is one of the sauces of French cuisine that were designated the five "mother sauces" by Auguste Escoffier in the 19th century, which was a simplification of the "Sauce Carême" list of Marie-Antoine Carême. The term velouté is from the French adjectival form of velour, meaning velvety.
In preparing a velouté sauce, a light stock (one in which the bones used have not been previously roasted), such as chicken, veal or fish stock, is thickened with a blond roux. Thus the ingredients of a velouté are equal parts by mass butter and flour to form the roux, a light chicken, veal, or fish stock, and salt and pepper for seasoning. Commonly the sauce produced will be referred to by the type of stock used e.g. chicken velouté. (Source: Wikipedia)
Velouté sauce is often served on poultry or seafood dishes, and is used as the base for other sauces. It is basically a gravy.
Ingredients
2 tbsp butter
¼ cup flour
2 cups chicken stock or broth
Salt and Pepper
Procedure
Melt the butter in a medium saucepan.
Stir in the flour and cook by stirring for about 1 minute or until the butter and the flour are incorporated/mixed.
Gradually, stir in the stock.
Add salt and pepper. Continue to stir until all ingredients are fully mixed in. Bring to a boil and simmer for 2 minutes or until it has reached a good consistency.
Makes about 2 cups.
May 12, 2012
Tuna Omelette
When I was about to begin college back in the early 90s (am revealing my age here now!), I moved from my province (Marinduque) to the big city (Quezon City, Metro Manila) where my university was located. This meant that I could not see my cousins as often as I wanted (we were neighbors and lived in the same town in Marinduque).
Usually, during weekends I would visit their place so I could stay with them for a day or two and just enjoy their company. More often than not, if we are not watching a movie or malling (window shopping), we just stayed in their city apartment. I love those days --- if we just stayed home then it meant time would be spent singing our hearts out in front of the karaoke machine (this is the quintessential Filipino past time!). Thankfully, their neighbors tolerated our music and never once ever reported us to the authorities for violating the nuisance law.
For merienda (Filipino term for "snack"), we would often have our favorite Lucky Me Pancit Canton... sarap!!! (delicious!)
Photo is from http://nansantamaria.aminus3.com/image/2008-07-01.html.
Apart from munching on Lucky Me, one of my fave food memories was when we ate Tuna Omelette for lunch, courtesy of their super cook and all around help, Ate Lanie. Wow, I do miss her world-class adobo too....but that would be for another post.
Before I ever had Tuna Omelette in their house, I never really liked Tuna, especially the canned variety. Eeeewww. But I have been converted ever since and now am a canned Tuna lover.
When I am out of ideas on what to have for lunch (yes, there are such days) and all I can find in my pantry are canned tunas and a few eggs on my fridge, voila Tuna Omelette is my first choice. It's just comfort food for me and brings me back to those days in Sampaloc, Manila.
Ingredients
2 cans of Tuna (pref. in oil, not the water packed ones cause they're tasteless)
2 eggs
Salt and pepper, to taste
a little oil, for frying
Procedure
Heat a little oil in a frying pan.
Drain the liquid from the canned tuna and place it on a bowl.
Set the tuna on one side of the bowl and place the eggs beside it. Scramble the eggs.
Mix the tuna with the eggs. Season with salt and pepper.
I usually divide this dish into four. I use a measuring cup (1/3 cup capacity) to divide it evenly.
Once the oil and the pan are hot enough, fry each omelette. You can fry two or more at the same time depending on how big your pan is. Flatten the tuna to distribute it evenly and get an even browning. Fry till the egg has set and it's golden brown, roughly 3-4 minutes.
Flip and fry on the other side until it's fully cooked - golden brown and crispy.
Transfer to a plate and serve immediately with rice on the side and some peas too. Traditionally, we eat this with ketchup but my kids prefer mayo. So use whatever works for you.
May 11, 2012
Arroz a la Cubana (Cuban Style Rice)
Arroz a la Cubana is a dish that you're always sure to find in any mall in the Philippines with a cafeteria. It's a classic comfort food which came by way of Spain (who colonized the Philippines for almost 400 years!). The Philippine version typically consists of rice, ground beef sauteed with onions, garlic, tomatoes, diced potatoes and diced carrots, a fried egg and plantains cut lengthwise and fried.
For this version, I replaced the potatoes with bell peppers (to add more color) and used a combo of ground pork and beef (for more flavor).
Since even my British husband loves this dish, and he doesn't mind eating this with rice for breakfast either (that's how much he likes this!) it has become a household staple.
A simple but flavorful recipe that's perfect for breakfast, lunch or dinner.
Ingredients
oil (about 2 tablespoons)
3 garlic cloves, chopped
1 medium onion, chopped
2 plum tomatoes, diced
1/2 lb ground beef
1/2 lb ground pork
4 tbsp light soy sauce
ground black pepper, to taste
1/2 a piece of a large red bell pepper, diced
1 small carrot, diced
1/2 cup raisins
1/2 cup peas
Procedure
Heat the oil in a large frying pan or skillet. Sauté the garlic and onion for about a minute. Add the diced tomatoes and cook until the onions and tomatoes have softened about 5 minutes. Stir in the ground beef and pork. Crumble with a fork to prevent clumping. Season with soy sauce and black pepper and cook until the meat has turned brown. Add the red bell pepper and carrots and then simmer covered for about 5-8 minutes or until the veggies have softened.
Uncover then stir in the raisins, raise the heat and cook for a further 3-5 minutes or until most of the liquid has evaporated. Add the peas and cook for another couple of minutes.
If
desired, season with a little Worcestershire sauce or to be truly pinoy
----- fish sauce for more flavor. Yum!
Serve hot accompanied with fried rice, fried eggs and if available – fried plantains!
If you wish to print the recipe, there's a print-friendly icon at the end of the post. Click on the "remove images box" for easy printing.
If you like what you see and would like to receive new recipe updates, we'd love you to subscribe to our posts or join our site. Needless to say, we'd love you to like us on Facebook too where you can get more recipes and updates. Thanks and happy browsing!
If you like what you see and would like to receive new recipe updates, we'd love you to subscribe to our posts or join our site. Needless to say, we'd love you to like us on Facebook too where you can get more recipes and updates. Thanks and happy browsing!
May 7, 2012
Chocolate Banana Muffin
Yum is the word....to describe this moist and chocolatey muffin. Chocolate melts in your mouth as you bite into the muffin....mmmmm.... I suggest eating it warm for the full melt-in-your mouth effect.
Ingredients
3 very ripe bananas
1 cup sugar
6 tbsp butter, softened*
2 eggs, room temperature
1 tsp vanilla
1 ½ cups flour
1 tsp baking soda
1/4 tsp salt
1 cup chocolate chips
*To soften the butter, take it out of the fridge and bring to room temperature, about an hour before you need it. In case that's not possible here's a good link on how to soften a butter quicker.
1 cup chocolate chips
*To soften the butter, take it out of the fridge and bring to room temperature, about an hour before you need it. In case that's not possible here's a good link on how to soften a butter quicker.
Procedure
Preheat the oven to 375F. Line a 12-cup muffin tin with liners. Prepare all the needed ingredients beforehand.
Mash bananas with a fork. My junior chef comes in handy at this point. While he's mashing the bananas I work on the other ingredients. You can also use the food processor for this.
Cream sugar and the softened butter until light and smooth, about 3 minutes more or less. An electric mixer would be handy for this. Beat the eggs one at a time into the mix then add the mashed bananas and vanilla. Continue to beat just until smooth and no more big lumps appear. Do not overbeat.
Sift together the dry ingredients - flour, salt and baking soda.
Add the dry ingredients to the wet ingredients; mix until just combined.
Fold in the choco chips.
Spoon the batter evenly into the prepared muffin pan. Bake for about 20-23 minutes or until a toothpick inserted in the center comes out with only a few crumbs clinging to it.
Let it cool on the muffin tray for about 5 minutes (until cool enough to handle). Transfer to a wire rack to cool completely.
Enjoy!!!
Subscribe to:
Posts (Atom)
©
Manila Spoon | All rights reserved.


