Top Recipes

Recent Creations

Aug 4, 2012

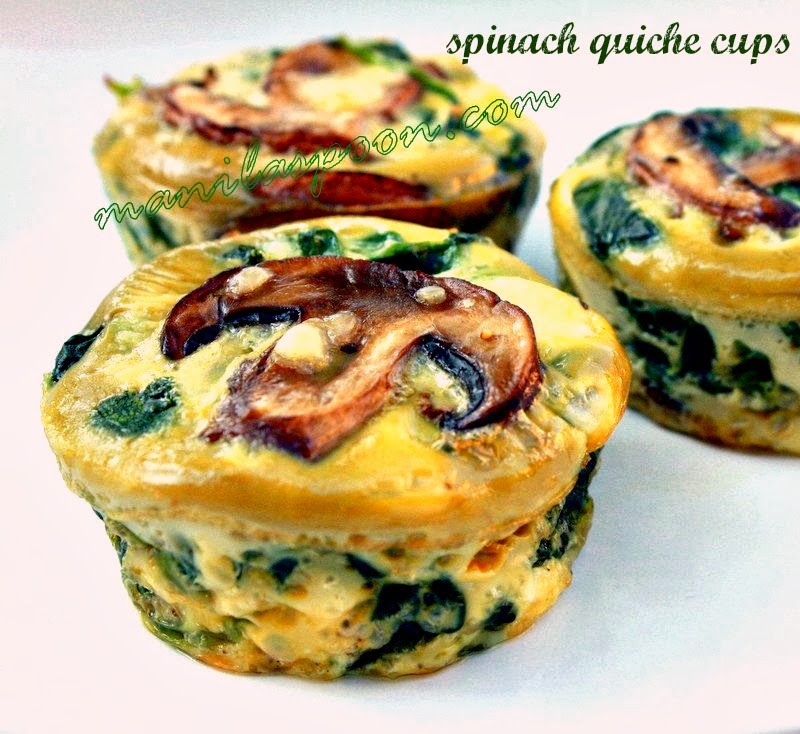
Spinach Quiche Cups

Completely gluten-free and low-carb is this healthy and delicious SPINACH QUICHE CUPS that everyone will enjoy. You can tweak the recipe to add your favorite vegetables! 


A friend of mine is a distributor of Demarle products (Silpat, Flexipan and Silform non-stick bakeware made of fiberglass and food grade silicone from France). This week she kindly lent me some of her wares so I could try them at home and learn how to use them, or sort of put them to the test.


One of the products I borrowed was her flexi-muffin tray. Since it is supposed to be non-stick, I thought the perfect dish to try would be my crustless spinach quiche cups (inspired by South Beach Diet's Vegetable Quiche Cups), my favorite breakfast treat when I am in the mood for a low-carb and gluten-free diet. I love these mini-quiches but when I bake them without using liners, it can be painful to clean up the pan afterwards. That's despite the claim that they are non-stick and that I even used some oil spray on them. So, I am really looking for a product that I can use for this recipe - one that will truly work and would also provide hassle-free cleaning. 


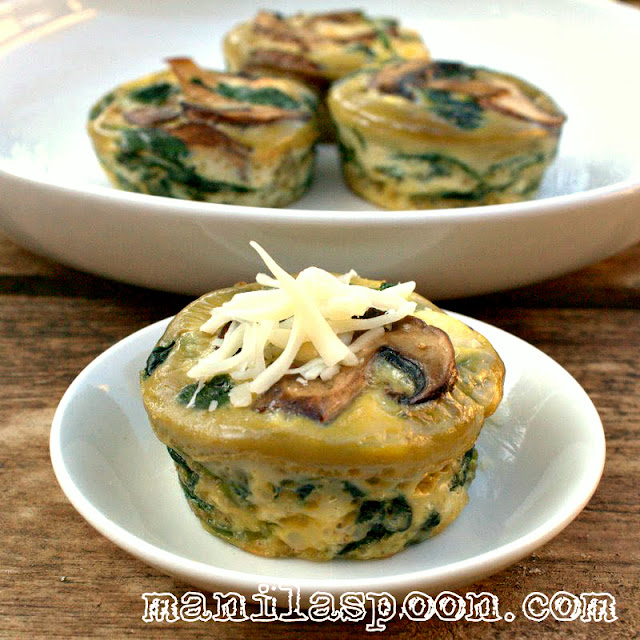
Wow, I am amazed at the result! One look at the photo above and you can already see that it was an astounding success. Look at these beautiful quiches, how they stand up so well, perfectly shaped, didn't look like half of them were left in the muffin pan (that usually happens before I used this wonderful product). I also tried baking raspberry muffins in the flexi-tray and they came out beautiful as well.

And, because it's truly non-stick I did not use any muffin liners nor did I ever need to grease the pan. How's that for convenience? However, if you don't have this pan, don't fret, either just use muffin liners or grease your muffin pan.

Here's the recipe for the spinach quiche which is truly a healthy low-carb and gluten-free breakfast. Try it!


Print Friendly and PDF 

 Ingredients

A little olive oil (for cooking the mushrooms)

1 (10 oz) package fresh spinach (I used the baby ones) --- about 284 grams
4 eggs (if the yolks are quite small I use 5 eggs)
1 cup shredded cheese of your choice (I use mozzarella or the Italian Blend)
1 (8 oz package) mini-bella mushrooms, chopped
1-2 Tbsp, heavy cream or half-and-half (optional)
Salt and Pepper, to taste

*Variation - If you don't fancy mushrooms, try asparagus or bell peppers with the spinach. Also, add some onions to the mix. I add some when I do not use mushrooms.

Procedure

Preheat the oven to 375F or 190C.

Heat a little oil in a large skillet. Saute the mushrooms until they are soft, about 5-6 minutes. Set Aside.


Place the spinach in a deep pan or in the skillet that you used for the mushrooms. Add a little water, 1/4 cup should do it. Using medium heat, cook the spinach just until wilted, about 3-4 mins. Use either your hand or a spatula to pack in the spinach. Drain the excess water really well (especially if you decide to use frozen spinach instead).


In a large mixing bowl, whisk the eggs until combined. Add the cooked mushrooms, spinach, cheeses and cream (if using) to the eggs. Mix well. Season to taste. 


Divide evenly among the 12 muffin cups. The muffin tray was slightly bigger than usual so I only filled about 10 cups.


Bake for about 20-23 minutes, or until it's well set and a tester/toothpick inserted in the center comes out clean.


Leave in the pan for a few minutes or just until it's cool enough to handle. It was so easy to remove them from the pan! They practically pop-out!

Sprinkle with a little more cheese on top, if desired. Mark enjoys them with rice on the side!

If you like what you see and wish to receive updates on new recipes, feel free to subscribe to our feed, like us on Facebook  or follow us on Pinterest. Thank you so much for dropping by! Happy eating!


Share:

Jul 23, 2012

Mushroom and Feta Cheese Scramble


We love eggs for breakfast. But sometimes, the same old, same old style can get really boring. So, rummaging in the fridge one breakfast morning, I looked around to see what I can use with eggs. I saw some mushrooms and I always pair them with eggs. But I have half a tub of feta cheese that still needed to be used. So there goes, instead of the usual cheddar cheese on my omelette and scramble I thought why not feta instead. So here's an easy breakfast scramble that just works so well together! Let's have a great start to our morning!

 Ingredients


A little olive oil (about 2 Tbsp) or non-stick spray
5 large eggs (some eggs have really small yolks so add more if needed)
8 oz mushrooms sliced
2-3 tablespoons low fat crumbled feta (I had the flavored one but it doesn't matter really)
Salt and pepper, to taste

 Procedure

Heat a little oil or use a nonstick oil spray in a medium to large skillet. When the oil is hot enough, saute the mushrooms until tender about 5 minutes.


While you are sauteeing the mushrooms, crack the eggs and then whisk them to combine. Season with salt and pepper.  When the mushrooms are done, move them to one side of the pan and then pour in the eggs. Let them set for a bit.


Scramble until the eggs are almost done. Add half of the crumbled feta cheese and continue to cook until the eggs are fully done.


Serve with the remaining feta cheese on top. Don't forget the rice!

If you wish to print the recipe, there's a print-friendly icon at the end of the post. Click on the "remove images box" for easy printing.


If you like what you see and would like to receive new recipe updates, we'd love you to subscribe to our posts or join our site. Needless to say, we'd love you to like us on Facebook too where you can get more recipes and updates. Thanks and happy browsing!
Share:

May 12, 2012

Tuna Omelette


When I was about to begin college back in the early 90s (am revealing my age here now!), I moved from my province (Marinduque) to the big city (Quezon City, Metro Manila) where my university was located. This meant that I could not see my cousins as often as I wanted (we were neighbors and lived in the same town in Marinduque). 

Usually, during weekends I would visit their place so I could stay with them for a day or two and just enjoy their company. More often than not, if we are not watching a movie or malling (window shopping), we just stayed in their city apartment. I love those days --- if we just stayed home then it meant time would be spent singing our hearts out in front of the karaoke machine (this is the quintessential Filipino past time!). Thankfully, their neighbors tolerated our music and never once ever reported us to the authorities for violating the nuisance law.

For merienda (Filipino term for "snack"), we would often have our favorite Lucky Me Pancit Canton... sarap!!! (delicious!)


 Photo is from  http://nansantamaria.aminus3.com/image/2008-07-01.html.

Apart from munching on Lucky Me, one of my fave food memories was when we ate Tuna Omelette for lunch, courtesy of their super cook and all around help, Ate Lanie. Wow,   I do miss her world-class adobo too....but that would be for another post.  

Before I ever had Tuna Omelette in their house, I never really liked Tuna, especially the canned variety. Eeeewww. But I have been converted ever since and now am a canned Tuna lover.

When I am out of ideas on what to have for lunch (yes, there are such days) and all I can find in my pantry are canned tunas and a few eggs on my fridge, voila Tuna Omelette is my first choice. It's just comfort food for me and brings me back to those days in Sampaloc, Manila.  

Ingredients

2 cans of Tuna (pref. in oil, not the water packed ones cause they're tasteless)
2 eggs
Salt and pepper, to taste
a little oil, for frying 


Procedure

Heat a little oil in a frying pan.

Drain the liquid from the canned tuna and place it on a bowl.


Set the tuna on one side of the bowl and place the eggs beside it. Scramble the eggs.
Mix the tuna with the eggs. Season with salt and pepper.


I usually divide this  dish into four. I use a  measuring cup (1/3 cup capacity) to divide it evenly.


Once the oil and the pan are hot enough, fry each omelette. You can fry two or more at the same time depending on how big your pan is. Flatten the tuna to distribute it evenly and get an even browning. Fry till the egg has set and it's golden brown, roughly 3-4 minutes.


Flip and fry on the other side until it's fully cooked - golden brown and crispy.


Transfer to a plate and serve immediately with rice on the side and some peas too. Traditionally, we eat this with ketchup but my kids prefer mayo. So use whatever works for you.


Share:

May 4, 2012

Tortang Talong (Stuffed Eggplant Omelette)


Perhaps the humble eggplant is mostly known for its use in Italian cooking. In the Philippines we grow them a lot so they are pretty popular especially for breakfast. We pre-cook the eggplant and then sort of mash it, add some eggs and voila yummy eggplant omelette. You can prefer to just use plain eggplant in an omelette but why not up the omelette a notch by adding some meat on it.

Click here for the  ground pork sauté recipe which is indispensable for this eggplant omelette.


Ingredients

Eggplant, preferably the Asian/Japanese variety
1 Egg (add more if using more eggplants)
Salt and pepper
Cooked ground meat (see above link for recipe)

Procedure

Wash the eggplants and dry them with paper towels.

There are a few ways to cook an eggplant. If you have a gas burner, you can grill your eggplant on top of it until the skin gets charred and can be easily be removed from its flesh. The eggplant should also be very tender at this point.

If you don't have a gas burner but an electric stove top, you can use the oven broiler instead. This is what I usually do.

Heat the broiler from 450-500F. Place the eggplant under the broiler and cook until it is soft, charred and its skin easily separates from its flesh. This can take roughly between 20-30 minutes depending on the size and thickness of your eggplants.


Beat the egg on a bowl. Place the eggplant on top ensuring that it is fully coated with the eggwash. Mash or flatten the eggplant. Season with salt and pepper.


Heat some oil in a frying pan. Slide the eggplant to the pan and start frying it. If using the ground pork saute, place 2-3 tablespoons of the meat on top of the eggplant. You can use the eggplant's stem to lift it up and check to see if the other side is already cooked. If the bottom of the eggplant has set and is cooked, flip it over to cook the other side. Fry until it has set and has turned a lovely golden brown.


Transfer to the plate and enjoy with rice for breakfast or lunch! To be truly Pinoy, eat it with ketchup as your condiment.

If you wish to print the recipe, there's a print-friendly icon at the end of the post. Click on the "remove images box" for easy and convenient printing.

If you like what you see and would like to receive new recipe updates we'd love you to subscribe to our posts and join our site. Also do like us in Facebook so you can get the latest updates and so much more. Thanks for visiting and happy browsing! 


Share:
© Manila Spoon | All rights reserved.
Blogger Template created by pipdig