Jun 30, 2012

Mango Smoothie


Oh summer! The perfect time to make fruit smoothies/shakes in the Philippines. Truly, the best way to cool down in a hot country.

While summer in Michigan does not get as hot and humid like the Phils (thankfully!), it's still great to make fruit smoothies to cool down. It's a good way as well to make my kids drink their fruits. Who can say no to freshly made fruit shakes! Mine don't!

When it comes to fruit smoothies, hands down, Mango Smoothie reigns supreme for me. The next one on my list would be Avocado Smoothie (yup, you read it right! Avocado is considered fruit in the Phils! More on this on my next post...)  and then.... Guyabano (Soursop fruit) Smoothie. The last one I miss terribly cause I have never seen the fruit ever in any grocery store here. But, let me not forget, Papaya Smoothie, it can rival any of the three in taste if you find the ripest juiciest one! 

Anyway, I can go on and on 'cause there are many other tropical fruits that you can use for a fruit shake in the Philippines. I have even tried Durian shake and amazingly loved it!

In the Philippines, we pride ourselves in having the best mangos in the world. I have yet to taste another one which can equal ours. Pardon me, but all Filipinos will say this! :-) Carabao Mangos (picture below) when ripe to perfection are the best for fruit shakes.


These mangos, which look like Champagne mangos, are from my province, Marinduque. They are so nice and sweet too!


I am just thrilled that at least I can find some nice mangos here so I can satisy my mango cravings.

For the smoothie, I used the Mexican Ataulfo Mangos and the Champagne Mangos (the latter is really a variety of the Ataulfo kind). The only difference is the Ataulfo one is really sweet while the champagne variety is more sweet-tart. I found out that Ataulfo mangos are actually bred from seeds of the Manila Mangos (yes, the famous Philippine ones) which were combined with other mango seeds from somewhere else. Am no expert but I do taste a bit of Manila Mango sweetness there, so perhaps it's true! At least, am getting some Philippine mango there!


Ingredients

4 Ataulfo ripe mangos or 4 Champagne mangos (use the latter if you wish to have a sweet-tart shake reminiscent of a green mango shake)

* The photo below shows only 3 mangos but I actually used 4 of them.


1 1/2 cups crushed ice


1/4 cup milk, or to taste (optional)
Sugar (2-3 Tbsp), or to taste 

Procedure

Rinse the mangos. Wipe dry.  To get the mango flesh, you can cut off either side of the mango down to the part where your knife touches the seed (you want to get as much mango flesh). 


Then, cut lengthwise and then crosswise across the flesh down to the skin. They call this the hedgehog style of cutting a mango. See below. Scoop out the flesh with a spoon. Repeat with the remaining mangos.


Place the crushed ice at the bottom of the blender. Then add in the mangos.


Pour the milk, if using. Add the sugar too. I use between 2-3 tablespoons.


Then turn on the blender to mix all the ingredients. I use the shake or smoothie button on my blender. 


Serve immediately!


For a change, mix the mango with raspberries or any other fruit in season.


Happy Summer!!!
Share:

Jun 27, 2012

Abby's Chicken Curry

I maybe Asian but I was never fond of curry dishes. The Filipino cuisine is not generally spicy compared with our other Asian neighbors. But then I married my British husband, Mark, who is so into curry. He got me into it and now I really love curry dishes and will often cook it for my family.
Here's a chicken curry recipe that we love - spicy bite with a hint of cinnamon sweetness.


Ingredients:

1 kilo / 2 lbs (about 8 pieces)  trimmed chicken thighs
1 tbsp each - butter and olive oil
6 garlic cloves, crushed
2 medium onions, chopped
2 tbsp curry powder (I usually use 1 tbsp each of mild and hot curry powder)
1 tsp turmeric
1 tsp cinnamon
1 tsp ground ginger
3 plum tomatoes, diced
salt and pepper
1-2 tsp sugar
3 tbsp chutney (optional)

Procedure:

Heat the oil and butter in a deep pan. Brown the chicken on both sides. If you don't like the skin you can remove it after the browning. Set aside.

In the same pan, saute the garlic and onion  in the pan drippings until aromatic about 1-2 minutes. Lower the heat and then add all the spices (curry powder, turmeric and ginger). 
Put the chicken back into the pan and coat with the spices. Add the rest of the ingredients (except the chutney). Stir. Don't worry if it seems to be dry, it will eventually create its own sauce.

Bring to a boil. Cover then simmer for about an hour or until the chicken is fully cooked and tender.

Stir in the chutney (if using). At this point there would be a lot of sauce which is great to pour on rice. Adjust the seasonings with salt, pepper and a little sugar, to taste.  Serve with freshly boiled rice and thick plain yogurt (if desired).


Note: 

This dish may be prepared a day ahead so the flavor is fully absorbed by the chicken thighs. Also, you will be able to skim the fat right off if refrigerated a day before it is served.

If you like what you see and would like to receive recipe updates, we'd love you to join our site or like us on Facebook. Happy browsing!

God is our refuge and strength, a very present help in trouble.  
Therefore we will not fear, though the earth should change, though the mountains shake in the heart of the sea;  though its waters roar and foam, though the mountains tremble with its tumult. (Selah)   Psalm 46: 1-3

Share:

Jun 25, 2012

Fruity Chicken Pasta Salad (aka Pinoy macaroni salad)


Ingredients

1 lb pasta  of your choice, cooked according to package directions (I used fall leaf-shaped pasta)
1 cup raisins 
1 cup pineapple chunks (drained)
2 apples, chopped
¾-1 cup cooked (boiled) carrots, chopped
3 Tbsp sweet relish (don't leave this out!)
1 cooked chicken breast, shredded
1 cup of mayonnaise (adjust to taste)
A little salt or sugar (to balance the flavor)

Procedure
In a big bowl, mix all the ingredients until fully coated with the mayonnaise. Adjust the flavor with a little salt or sugar. Make this a day ahead and refrigerate overnight to allow the pasta to fully absorb the flavors. Great for lunch or as a mid-day snack! 
 

Share:

Jun 21, 2012

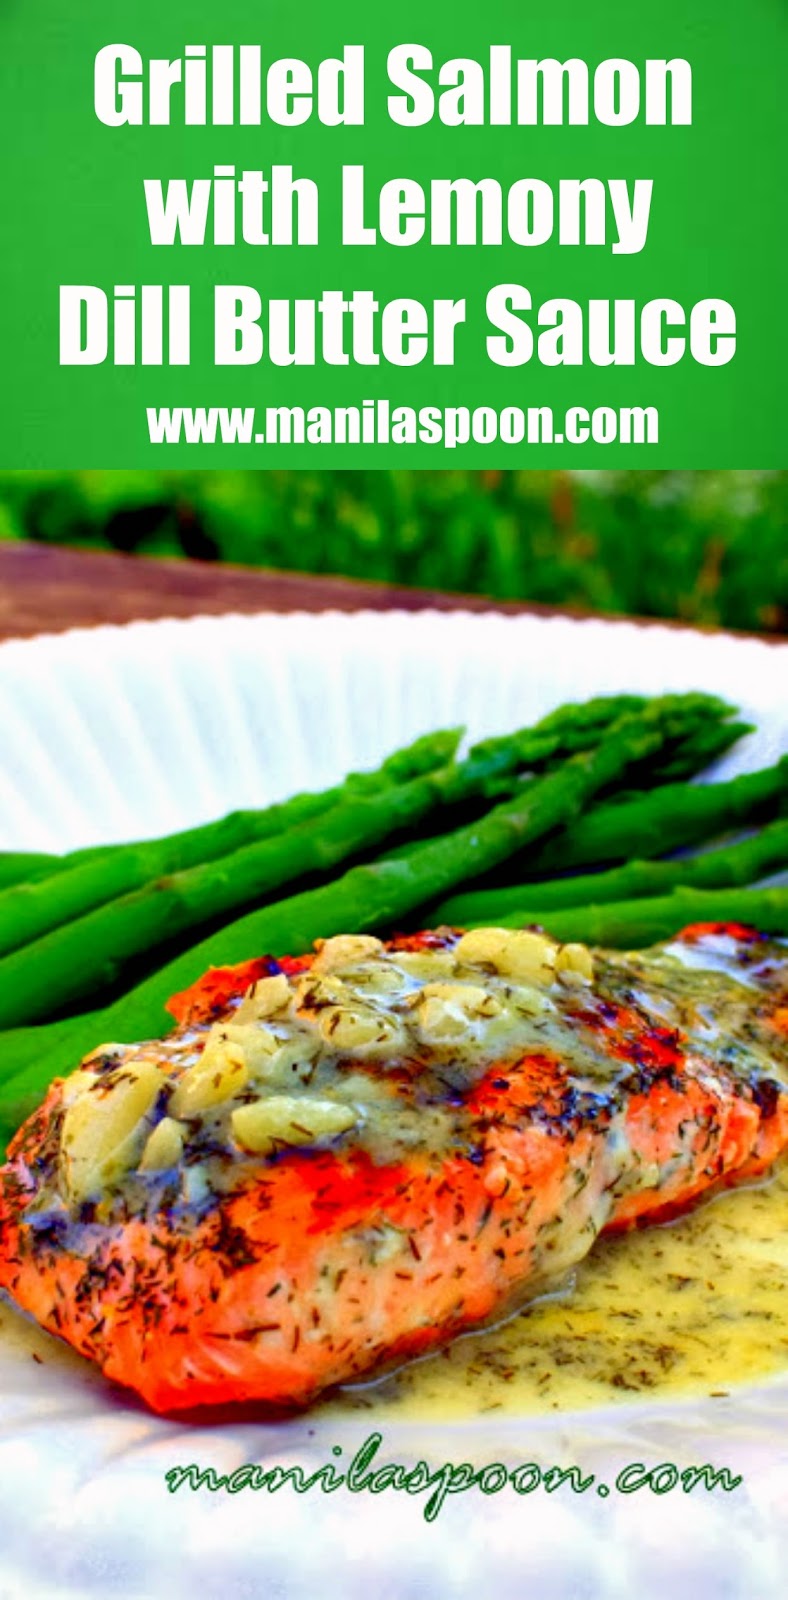
Salmon with Tangy Dill Butter Sauce


Easy Grilled Salmon recipe with a Lemony Dill Butter Sauce that brings this dish over the top! Gluten-free and low-carb deliciousness!

We have fish, like Salmon, for dinner at least once a week. We try to have a regular supply of Omega-3 from seafood. :-) However, when you have the same dish once a week, it can get boring. I try to look for different ways to cook Salmon. This is one dish which we have tried this week and though initially we didn't know if we'd like it, we tasted it and absolutely loved it. We love the tangy and fresh taste that the lemon juice brings to the fish. The tangy Dill Butter sauce complemented the salmon and made it oh-so-delicious. Try it and see if you like it!


Print Friendly and PDF


For the Salmon

Ingredients

1 lb Salmon, cut into fillets or  4 pre-cut fillets
Dried dill weed,  2 tsp or to taste (if fresh about 2 Tbsp)
Salt, to taste
Lemon and pepper seasoning, to taste

Procedure

Preheat the grill, if using one. You can fry the salmon too if you prefer.

Clean the salmon fillets and then wipe them dry with paper towels. You can either marinate the salmon in lemon juice or just season it.


I marinated the fish in lemon juice for about 10 minutes. It did make the fish tasty and moist but the fish did not become as crispy as I wanted it to when I grilled it. So, it's up to you. You may choose to just season it really well, instead of marinating it.

Drain excess liquid from the fish if you marinate it. Season the fish with dill weed, salt and lemon pepper seasoning.


Grill the salmon, depending on the thickness of your fillet, for about 5-6 minutes per side. If you have skin on the salmon, grill it with the skin-side down first. Flip over to grill the other side, turning only once. It's cooked when it flakes easily and the color has lightened.


While you are grilling the salmon, you can do the Tangy Dill Butter Sauce. Keep it warm.


For the Tangy Dill Butter Sauce

The amount of sauce in this recipe is just right for about 4 fillets of salmon so feel free to increase it if you're cooking for more than 4.

Ingredients

A little oil, about 1 tsp
1 garlic clove, minced
2 Tbsp dry white wine
2 Tbsp of freshly squeezed lemon juice 
1 1/2 tsp dried dill weed ( 1 Tbsp fresh dill)
3 Tbsp butter
Salt, to taste
1 Tbsp heavy cream (optional)
A pinch or two of flour (leave it out if you want it gluten-free)

Procedure

Heat a little oil in a small sauce pan. Saute the garlic for a minute or less, just until it releases its aroma; don't let it brown. Pour in the white wine. Let it reduce to about half. Add in the lemon juice and the dill weed. Stir.  Let simmer for a minute. Add the butter and let it slowly melt as you stir it.


Season with salt, to taste. It should have a sour bite. As we say in the Phils, "Mukhasim talaga!" You can add a little cream if you think the lemon juice overpowers the rest of the ingredients. Add a pinch or two of flour to thicken it slightly (optional).


Transfer the grilled salmon to a plate and drizzle the sauce on top. Serve the salmon with your favorite veggies (steamed asparagus are our fave with it!) and accompany it with a side of rice, if you wish. Mark loves to pour some of the sauce on the rice. He thinks it's really yummy that way. I believe him!


Easy Grilled Salmon recipe with a Lemony Dill Butter Sauce that brings this dish over the top! Gluten-free and low-carb deliciousness!

If you like what you see and would like to receive new recipe updates we'd love you to subscribe to our posts and join our site. Also do like us in Facebook so you can get the latest updates and so much more. Thanks for visiting and happy browsing!

Easy Grilled Salmon recipe with a Lemony Dill Butter Sauce that brings this dish over the top! Gluten-free and low-carb deliciousness!

Share:

Jun 17, 2012

Delicious Ground Beef Tacos


That this is William's and Sophie's favorite is no exaggeration. The photo below shows their excitement whenever this is laid on the table. They love this dish so much that they were willing to sit still so I could take their photo knowing that soon they'd be munching on their favorite food. 

I often serve this during weekends. Because it is quite special for them it is something they always look forward too.


But don't get me wrong, it's not just the tots who enjoy this! Mark and I equally love it too!


Ingredients


1 Tablespoon (Tbsp) olive oil
4 garlic cloves, minced
1 large onion, chopped
3 Tbsp tomato paste
1 Tbsp chili powder
1 teaspoon (tsp) ground cumin
1 tsp paprika
1 tsp coriander
1 tsp salt
Ground pepper, to taste
1 lb lean ground beef
Corn/Flour tortillas


Procedure 

Heat oil. Saute garlic briefly until aromatic, just a few seconds. Add the beef, crumble with a fork as you brown it. Add the chopped onion and cook until soft about 5 minutes.


Stir in the tomato paste, chili powder, cumin, paprika and coriander; season with salt and pepper. Adjust heat to low and simmer for about 10-15 minutes stirring occasionally to allow flavors to infuse.  Remove from the heat and transfer to a serving plate.


To serve, spoon the filling onto tortillas, top with some salsa or plain diced tomatoes, shredded lettuce, sour cream or cheese and some chopped fresh cilantro, if desired. For the adult, add a few drops of hot sauce for some added kick!

If you wish to print the recipe, there's a print-friendly icon below the post. Click on "remove images box" for easy printing.


If you wish to get updates or follow the recipes, feel free to sign up or join our site. You can also follow us through our Facebook page. Thanks for visiting!

Share:

Jun 16, 2012

Cilantro-Lime Rice


 Since we arrived in the USA, Mexican food has become one of our favorites. Mark loves spicy food and he doesn't often get his fave Indian curries in Michigan (unless I make them) so he's happy to satisfy his palate with the Mexican alternative. We often have tacos on the menu but it won't be complete without the cilantro-lime rice on the side. The citrusy, moist cilantro-flavored rice is such a wonderful side dish that you can serve it even if you're not having Mexican food. We make a big batch of this (just because we love it so much!) and use the left-over for sinangag (Pinoy fried rice) the next day so nothing is wasted.


I have searched the internet for a good cilantro lime rice and I chanced upon this one. I thought the idea was great and decided to try it. Unfortunately, since this was not on a blog post but on a comment page and the person did not wish to reveal his/her identity I don't know who to acknowledge. But am just happy he/she decided to share it. There were no exact measurements given, just mostly the ingredients so I just adjusted it to my taste and feel free to do the same. After all, what may be tart for me may still be sweet or even bland for somebody else!

A rice cooker would be handy for this but you can always use a large sauce pan and cook the rice on the stove top. For this dish, basmati is the best rice to use for it doesn't get sticky and the grains remain separated even after the oil and the citrus juice has been added but if you don't have it jasmine or any long grain rice is fine too. You may choose to use the entire rice as measured in the recipe or however much you need.

Also, I like that the recipe uses different kinds of citrus fruits (though it's popularly made only with lime). I like the combo of the juices of 1 lime and 1 orange. The sweet orange flavor balances the tartness of the lime. But you may add 1 lemon too in the mix. Just note that it will be sharper so perhaps you need to use less juice when you mix it with the rice. 


Ingredients


1 cup of uncooked jasmine/basmati rice (use measuring cup not the rice cooker cup)
1 1/2 cups water, more if needed (use the same measuring cup)
2 small bay leaves
Juice of 1 orange and 1 lime or a combo of 1 orange/1 lemon/1 lime (the latter combo is sharper) - use about 4 Tbsp or to taste (the left over juice I give to my tots who love it!) 
1 cup of fresh cilantro, chopped
2 Tbsp (neutral flavored oil like canola oil but I did try light olive oil and it was fine)
Salt, to taste


Procedure


First, place the rice and water in the rice cooker. Insert the 2 bay leaves on the rice. Cook. The rice cooker will automatically turn to warm setting when it's done. Let it rest for a few minutes.


This is what the rice should look like when it's done and after removing the bay leaves.


While the rice is resting, juice the orange and lime and lemon (if using). Set aside. Prepare the cilantro leaves. We love cilantro so we put in a lot. Add as much as you want.


When done preparing the citrus fruits and cilantro, get the oil and pour it slowly on the rice. Coat the rice with oil.  

Add the cilantro, juice and the salt and mix well with the rice. Enjoy!

If you wish to print the recipe, there's a print-friendly icon at the end of the post. Click on the "remove images box" for easy printing.

If you like what you see and would like to receive new recipe updates, we'd love you to subscribe to our posts or join our site. Needless to say, we'd love you to like us on Facebook too where you can get more recipes and updates. Thanks and happy browsing!

Share:

Jun 14, 2012

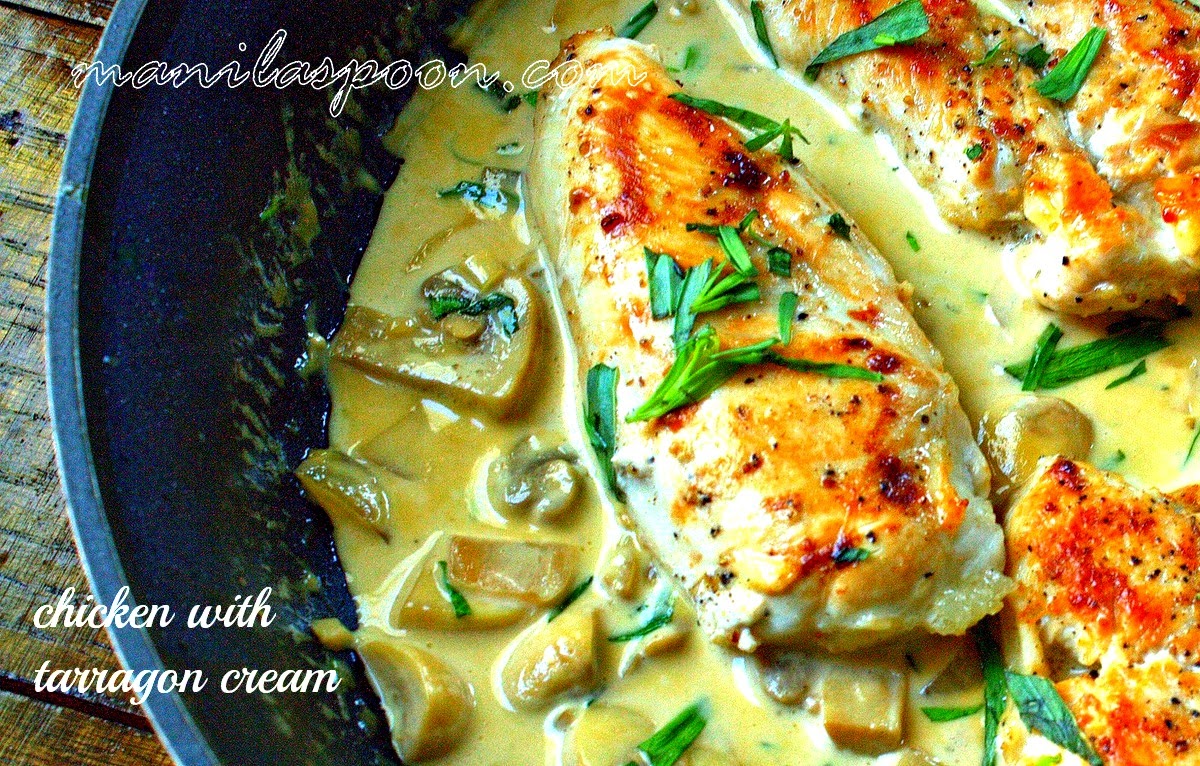
Chicken with Tarragon Cream


Recently, I have been experimenting on French dishes. I don't really know why, I supposed I was just fancying something creamy and buttery.  I looked at my fridge and saw that I still had some chicken breasts that needed to be cooked and the mushrooms were begging to be used. There were still some left-over cream and half a bottle of white wine which I have used recently in a few dishes. 

The only ingredient missing is something that will give the dish some vibrant color and freshness. Thankfully, I have been cooking with the tarragon herb lately due to my husband's craving for Chicken, Cashew and Tarragon Stir-Fry. So there goes the solution - a little tarragon goes a long way in this dish.

I had been doing the South Beach Diet to lose weight (I love this diet! I think it's perfect for meat lovers like me!) and if you are into low-carb, this is one of the dishes that you need to learn by heart. It's pretty simple and yummy, too. And to replace the carbs --- I know deep in my heart that rice would be perfect with this for it will absorb the creamy sauce but, alas, not when am on a diet --- I suggest steamed/boiled cauliflower, which is the perfect replacement for rice or potatoes. You can certainly make mock mashed potatoes using this wonderful vegetable.  

So here it is, enjoy!


If you like what you see do subscribe to our posts via email. You can also like us in Facebook or  join us on Pinterest so you can get the latest recipes and so much more. Thanks for visiting and happy browsing! 


Print Friendly and PDF

To delete the photos for printing, click on the image box and tick the "remove" button.

Ingredients

2 Tablespoons light Olive oil
1 lb chicken breasts (about 2), skinned, boned and halved (season with salt and pepper)
1 medium onion, chopped
3 garlic cloves, chopped
8 oz mushrooms, chopped
1/3 cup dry white wine (use low-carb and gluten-free)
1/2 cup heavy cream
2 tbsp fresh tarraron, chopped
Salt and pepper, to taste

Procedure

Heat the oil in a large skillet and sauté the chicken breasts, about 3 minutes per side.


Set the chicken aside. Add the onion and garlic to the pan and cook gently for about 2 minutes or until the onion begins to soften.


Increase the heat and stir in the mushrooms. Stir-fry for about 4-5 minutes or until the mushrooms begin to color and give off its liquid.


Pour in the wine. Bring to a quick boil then reduce the heat slightly and simmer until most of the wine has evaporated. Add the cream and cook just until incorporated. Re-place the chicken in the pan and simmer until the sauce thickens. Stir in the chopped tarragon and season to taste.


Arrange the chicken on a serving plate and pour the sauce  over. Delish!

If you wish to print the recipe, there's a print-friendly icon at the end of the post. Click on the "remove images" box for easy printing.


Share:

Jun 8, 2012

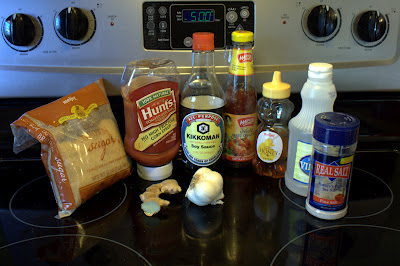
Slow Cooker Asian Barbecue Ribs


Whenever we have people over at our house, this is the recipe I frequently turn to. It's a proven winner. Everyone seems to love this and I always get asked for the recipe. What's even better, since it's slow-cooked, you can prepare it in the morning and then forget about it till the guests arrive and it's serving time. Easy and delicious.


I always pair this with rice and pancit. Perfect Asian meal.


Print Friendly and PDF

Ingredients

2 ½ kilos / 5 lbs of country style pork ribs, regular ribs or pork shoulder

For the sauce:


3/4 cup brown sugar
1/4 cup honey or agave nectar
1/2 cup soy sauce (get a wheat-free brand if you wish to do a fully gluten-free version)
1/2 cup ketchup
3 Tbsp rice vinegar
3 Tbsp sweet chili sauce
4 garlic cloves, minced
1-inch fresh ginger, chopped or 1/2 tsp ground ginger
1 tsp salt
Freshly ground black pepper, to taste
2 bay leaves (optional)

Procedure

In a large bowl, mix together all the ingredients for the sauce except the bay leaves  and the meat. Or if you are in a hurry, just mix all the ingredients in the slow cooker itself (again less the meat and bay leaves).


Note: If you want the meat to absorb more flavor, you can marinate the ribs on the sauce in the fridge overnight. I place everything in the slow cooker - place it on the fridge and then cook it the next day. 

Dip each piece of meat in the sauce until they are fully coated. Pour the remaining sauce on top of the meat. Insert the bay leaves.


Cook on low for about 6-8 hours. I usually crank the slow cooker to high for the first hour just to get a head start and then turn it back to low afterwards.

Transfer the cooked ribs (they'd be so tender they may fall off the bones!) to a serving platter and keep warm.  The remaining liquid will be quite watery. But you can use it as sauce already.

Alternatively, strain the liquid through a fine sieve or strainer to remove bits and pieces of meat and other ingredients in the liquid. You may use up all the sauce or just however much you want. Place the strained sauce in a saucepan and heat up gently. Thicken with either arrowroot or cornstarch to your desired thickness and consistency.

Drizzle the sauce on top of the meat. Garnish with chopped scallions. Serve with rice and your favorite veggies.

If you like what you see and would like to receive new recipe updates we'd love you to subscribe to our posts and join our site. Also do like us in Facebook so you can get the latest updates and so much more. Thanks for visiting and happy browsing!


Share:
© Manila Spoon | All rights reserved.
Blogger Template created by pipdig